


Nighttime photography has a special kind of magic. As the sun sets and the city lights flicker on, the world transforms. Colours shift. Shadows lengthen. And suddenly, everything you thought you knew about exposure, lighting, and composition changes. But for photographers willing to embrace the night, the rewards can be extraordinary.
In this comprehensive guide, we’ll explore everything you need to know about after dark street photography, including tips for shooting with available light, how to work handheld, and why one often-overlooked film stock—Kodak Pro Image 100—might be the best film you can use for your next night shoot.
Whether you’re shooting on film or digital, this guide is packed with practical advice, photo examples, and gear recommendations to help you take your nighttime street photography to the next level.
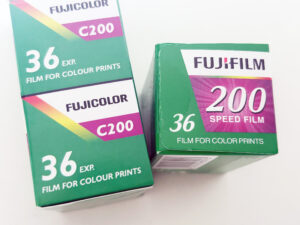
But the real heart of this article lies in a surprising recommendation: a humble, often-overlooked film stock called Kodak Pro Image 100.
You’d be forgiven for thinking that a 100 ISO film has no place in low-light photography—but you’d also be wrong. Pro Image 100, designed with natural light in mind, turns out to be one of the most versatile and expressive colour films for handheld shooting at night. With its wide dynamic range, punchy colours, and uncanny ability to preserve both shadow detail and highlight control, it punches well above its weight in the darkness.


There’s something captivating about walking through a city at night with a camera in hand. The streets are quieter, the light more dramatic, the colours more intense. Shadows stretch, neon glows, and the whole world feels like a movie set waiting to be captured. This is the world of nighttime photography, and it’s where creativity thrives under pressure.
1. Why Nighttime Photography Is So Captivating
Nighttime photography opens up a world of visual storytelling that’s simply not possible during the day. City streets, normally bustling with traffic and pedestrians, can feel eerie and cinematic after hours. Shadows deepen, colours intensify under artificial light, and every streetlamp, shopfront, and neon sign becomes a potential light source.
The Magic of the Night:
- Unexpected contrast and colour from neon, LED, and fluorescent lighting
- Unique mood and atmosphere—mystery, stillness, or quiet drama
- Less crowded streets, giving you more control over composition
- A chance to explore how available light changes the visual tone


2. Challenges of After Dark Street Photography
Shooting after dark introduces a host of technical and creative challenges. The biggest is light—or the lack of it. Low-light conditions force you to slow down, think more about exposure, and get creative with your settings.
Common challenges:
- Camera shake from slower shutter speeds
- Blown-out highlights from intense point sources (e.g., headlights)
- Lost shadow detail if exposure isn’t balanced
- Difficulty focusing in the dark
But these aren’t limitations—they’re opportunities to level up your photography.


3. What Is Available Light Photography?
Available light photography is the practice of shooting without any additional lighting equipment—no flash, strobes, or LEDs. You use what’s already there: street lamps, neon signs, window lights, traffic signals, and even headlights.
Why It’s Powerful:
- More natural and candid moments
- Cinematic, mood-driven imagery
- Minimal gear, maximum freedom
Night street photography using available light forces you to work with what you have and embrace unpredictability—which can lead to beautifully raw, authentic images.
4. Shooting Handheld at Night: Techniques That Work
If you’re working without a tripod (which most street photographers do), shooting handheld requires some careful techniques to avoid blurry shots.
Tips for sharp handheld night shots:
- Use a fast lens (f/1.4 to f/2.0)
- Choose higher ISO when shooting digital, or use a film with good push performance
- Steady your body: brace against a pole, wall, or crouch to stabilise
- Zone focus with wide lenses and high apertures
- Practice your handholding technique—it makes a difference
5. Best Lenses for Night Street Photography
Fast prime lenses are your best friend at night. You’ll want:
- Wide aperture (f/1.2–f/2.0)
- 28mm–50mm focal length for a natural perspective
- Manual focus (for film cameras) or reliable autofocus in low light (digital)
Top choices:
- Leica 50mm f/1.4 Summilux (as used in this article)
- Canon FD 50mm f/1.2L
- Nikon 35mm f/1.4 AI-S
- Voigtlander Nokton 40mm f/1.2
6. Why Kodak Pro Image 100 is the Ultimate Film for Night
Most people think fast film = better night shots. But Kodak Pro Image 100 is an underrated gem for after dark street photography—and here’s why.
What makes it so good at night:
- Incredible shadow detail retention
- Wide dynamic range—highlights don’t blow out easily
- Balanced contrast and saturation (unlike Portra or Ektar extremes)
- Designed for natural light situations, like weddings in dim churches
- Looks gorgeous under neon, fluorescent, or halogen lighting

With a fast lens and steady hands, you can shoot handheld in the street without pushing the film—and still get clean, vibrant images full of atmosphere.
7. Kodak Pro Image 100 vs Portra vs Ektar
To truly understand why Kodak Pro Image 100 excels in nighttime and available light photography, it’s useful to compare it with other popular colour film stocks like Kodak Portra and Kodak Ektar.
| Film Stock | ISO | Colour | Contrast | Best Use |
|---|---|---|---|---|
| Pro Image 100 | 100 | Vibrant but natural | Moderate | Balanced skin tones, low light, wedding & night street photography |
| Portra 400/800 | 160–400–800 | Muted, pastel tones | Low | Portraits, scanning latitude, day-to-night transitions |
| Ektar 100 | 100 | High saturation | High | Landscapes, punchy commercial images |
Key Takeaways:
- Portra gives a soft, romantic look but can feel too flat for nighttime street scenes.
- Ektar delivers extreme colour and contrast, but often sacrifices highlight control and shadow nuance in artificial lighting.
- Pro Image 100 strikes a beautiful balance—vivid yet realistic colours, detailed shadows, controlled highlights, and skin tones that don’t turn magenta under mixed lighting.
It’s also significantly more affordable, making it ideal for experimenting with different lighting conditions and shooting styles.

8. Camera Settings for Night Street Photography
Whether you’re shooting film or digital, settings can make or break your nighttime photos. Here’s what you need to know:
For Film (Kodak Pro Image 100):
- Shutter speed: 1/50s is the sweet spot for handheld—brace yourself and use steady breathing techniques.
- Aperture: f/1.4 to f/2.0 for more light and dreamy depth of field.
- ISO: 100 base—Pro Image 100 can be pushed to 200 or 400 if needed but performs best at box speed.
- Metering: Use incident light metering or spot meter for midtones.
- Focus: Pre-focus with zone focusing for quicker captures.
For Digital:
- ISO: 1600–3200 for clean images on modern sensors.
- White balance: Try “Tungsten” for city lights or manually correct in post.
- Shoot in RAW: Gives you flexibility in adjusting shadows and highlights.
- Manual exposure: Stay in control—avoid blown-out signs and store lights.
9. Composition Tips After Dark
Low light scenes can overwhelm or confuse your composition if you’re not intentional. Here’s how to make the most of nighttime visuals:
Look for:
- Isolated light sources: Lamps, lit windows, or LED signs create natural vignettes.
- Reflections: Wet pavement, puddles, or glass amplify available light.
- Silhouettes: Use backlighting to highlight figures or architecture.
- Leading lines: Roads, cables, and shadows become strong graphical elements in low light.
- Contrast zones: Use dark negative space to make lit subjects stand out.
Bonus tip:
Use light falloff creatively. You don’t need to light every part of your frame. Let shadows swallow some of your scene—it adds mystery and mood.
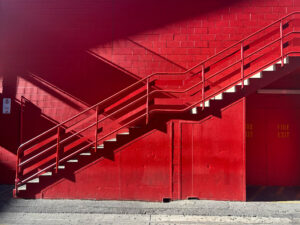
10. Real-World Examples and Case Study: Leica + Kodak Pro Image 100
All photos shown in this article were taken on a Leica MP with a 50mm f/1.4 Summilux lens using Kodak Pro Image 100, handheld, around the streets of Adelaide after dark.


Settings:
- Shutter speed: 1/50s
- Aperture: f/1.4
- No flash
- Developed and scanned by PhotoCo
These were scanned straight to high-res TIFF files with no post-processing. The resulting images showcase the beautiful glow of mixed lighting—halogen, neon, fluorescent—preserved with stunning clarity.
Here’s what made the images stand out:
- Warm tones in tungsten light looked realistic without oversaturation.
- Cool tones in shadows stayed rich and detailed, not muddy.
- Mixed colour temperatures blended smoothly.
- Skin tones in passing street portraits were creamy, not red or magenta.
This proves that Pro Image 100, when paired with a fast lens and steady hand, is more than capable for serious low-light street work.


11. How to Scan and Edit Your Night Shots
Once you’ve shot and developed your roll, how you scan and share your images will affect how they’re perceived.
Scanning Tips:
- Use a pro lab that offers high-res TIFF or RAW scans (avoid heavy JPEG compression).
- Ask for flat colour profiles so you can adjust contrast and saturation in post if desired.
- For home scanning, a Plustek OpticFilm or DSLR scanning setup works well.
Editing Tips:
- Don’t overcorrect white balance—preserve the natural street colours.
- Slightly boost contrast to enhance light/shadow interplay.
- Consider cropping to emphasise subject-light relationships.
12. Conclusion: Embrace the Night
Shooting street photography after dark challenges every assumption you have about light, gear, and technique. But it also unlocks a rich new visual world full of contrast, emotion, and atmosphere.
And surprisingly, one of the best tools for this job isn’t a fast digital sensor or the latest mirrorless camera—it’s a humble roll of Kodak Pro Image 100.
With its vibrant colours, wide latitude, excellent shadow retention, and realistic tone rendering under artificial light, it proves that available light photography on film is not only possible—it’s poetic.
So grab your camera, load up some Pro Image 100, and hit the streets. The night is waiting.
Whether you’re a beginner or seasoned photographer, this guide gives you the techniques, mindset, and film choice to create stunning night photos—with or without flash—that capture the true essence of the streets after dark.


